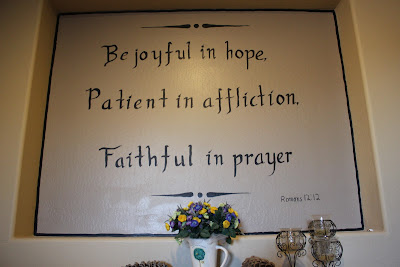
It took a few weekends to paint all of the walls a solid color in my home, but once the base color was on, I still felt it needed something more. I didn't have the money for artwork or picture frames (in the quantity I needed anyway) and I'm certainly not crafty enough to build my own frames, so that option was a bit daunting. Then I saw those expensive stencils or transfers for the walls with neat little quotes. I thought, I could just paint that! Thank you to Ms. Alves and my 6th grade art class where I learned calligraphy. Even if you don't know how, it's super-simple to learn here. Or you could use any other type of writing such a cute country look or block letters.
When people are in my home, I want them to feel peaceful. And what words could be more peaceful than scripture? So, I found verses which I felt "fit" the space. For my front entry, I used Psalms 121:8 and for my dining room, 1 Corinthians 10:31. I have a large inset at the top of my stairs where I painted Romans 12:12. This also happens to be just outside my bedroom, so everytime I go upstairs, I'm reminded of joy, patience, and faithfulness.
Once you've found a verse, quote, or saying that you like, it's simple to do and the only cost is a paintbrush and paint. I used acrylic paints for the lettering and it worked beautifully. The trick with lettering is to start from the center of the sentence or word and work your way to the edges; spacing the letters as evenly as possible. But first, with a pencil and a level or ruler, make a level line to use as your base to keep the letters level. You could also draw a couple other lines above it to act as a top and middle to help keep the letters the same size. Think those sheets of writing paper when you were in kindergarten.
When you've drawn your grid on the wall and found the center, paint the middle letter on the center of the grid. For example, for "BLESS THIS MESS" you would start by paint the letter "H" on the center and work your way to each edge, spacing the letters (and spaces) evenly.
If you're not comfortable painting the letters free-hand, it's easy to use your computer to print giant letters in the font that you want and trace them onto the wall or use as homemade stencils. I prefer free-hand just because perfection annoys me.
My total cost for personalized art: $10 in acrylic paint and brushes, which I've used several time since purchasing them and about 4 hours of my time.
How have you found inexpensive ways to beautify your spaces?


I love this idea! TFS!
ReplyDeleteFound you on Tip Junkie.
Thank you!
DeleteYour walls are beautiful, Athena!
ReplyDeleteThank you Mary! I was a little paranoid that nobody would like them and think "ok, Ms. Tacky" lol But I've gotten good feedback so far... :)
DeleteI LOVE these. I haven't gotten brave enough to try in on my walls, but I've used this technique to paint a verse on our porch swing.
ReplyDeleteBe brave! :) You can always paint over it. :)
DeleteThis is a good step for homeowners when they are making a significant designs and decorative ideas on their homes. I often find they have a hard time visualizing the transformation in their minds. www.affordablepainterswindsor.ca covers free estimate . But still after reading your ideas It was very helpful.
ReplyDelete